Here's hoping that this works...
My daughter and I played with the camera last night and created a You Tube Video showing how to fold the boxes using the gorgeous First Edition Stacks.
Click here to find it.....hopefully :-)
http://youtu.be/Nd9FGyVzxWU
Caroline
x
Tuesday 13 November 2012
Tuesday 22 May 2012
Little Treat or Favour Bags
This one has been popular out on the demos, and I have promised it would appear next. It's a little double pocket bag made from a few simple folds.


Sorry everyone, hope the photos don't give you all too much neck ache. I have tried lots of remedies, photobuckets and goodness knows what else this afternoon, but the sun's out, there's a choc-ice in my freezer and I have admitted defeat with a smile.
Caroline
xx

I started making these
for the Easter table with space for chocolate in the back pocket, then made
some with the Tea Party range. Need to think on Jubilee ones next!
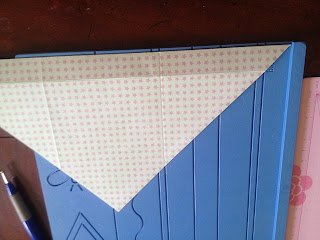
1. You need a piece of 8x8” paper. For my Easter
bag I used the First Edition Spring Stack and for these Tea party bags I’ve cut
down the 12x12” double sided paper to size.
2. Fold the 8x8” square in half diagonally.
3. Either on a score board or using a ruler score
along the diagonal edge.
I
used line 1 on my Eaziscore. For measuring and other boards score at 2cm.

4. Now along the diagonal edge measure in 10cm
from each point and score at right angles. I used line 5 on my Eaziscore board.
If using another brand of board find the line equal to or just less than 10cm. (PS - no I don't work upside sown, but for some reason Blogger is randomly altering my photos - who knows which way up the next one will be lol!)

5. Crease all score lines.
6. Open out Square and fold two points in as
shown. They will overlap slightly; they need to do this. (ah sideways working now lol)

7. With both side points folded in, fold the top
point down to the bottom one using the centre horizontal fold. So that the two
points meet together.

8. Now fold both points back up using the second
fold lines.


9. Punch a hole in the top so you can secure the
two open pockets with ribbon. If you want to ink the edges do this now before
you secure the ribbon.

10. Now decorate with Doilies and stickers from the
Tea party range. These will take little bars of chocolate: cover the outer wrapper in the papers to match in if you wish. They will also take gift cards and more.

Sorry everyone, hope the photos don't give you all too much neck ache. I have tried lots of remedies, photobuckets and goodness knows what else this afternoon, but the sun's out, there's a choc-ice in my freezer and I have admitted defeat with a smile.
Caroline
xx
Wednesday 9 May 2012
Scrapping project using new London Line
Received a Trimcraft stock top up this week: the new London Line range.
I will make cards with it but this is my first project.
I've been wanting to use the photos of our fab trip to see Matilda the musical. (which I have to say was well worthy of all it's awards!) and London theme was perfect.
This is a cheap jigsaw from a discount book store. Each piece is stripped of its picture and then has photos or papers stuck on. File edges with an emery board to get a better finish.
Finally stick pieces back in place and add embellishments.
Hope you like.
I'm heading off to buy more jigsaws I can think of other themes I wanna do :-)
Friday 23 March 2012
Dovecraft paper blossoms
Here are the blossoms given a little 3d treatment...plus Fizzy Moon wedding decoupage balanced on a spring!! Not saying the Mrs has put on weight, but he looks a bit wobbly :-)

Flowers
Thanks to the lovely Karen at Birds in the Barn, I've got the hang of roses now. I was using the wrong glue and not flattening their bottoms as much as I should!
Using a six petal punch you need four flowers and two apples! Hopefully you can see how ive cut into them and stuck them together. Then turn over and dent bottoms. I'm using a wooden stick or embossing tool.
The glue is Glossy Accents by Ranger.
Cut stalk off apples, curl and place in centre upside down. Tadaa!
Now on demo I'm adapting this to produce 3D flowers with the Dovecraft paper blossoms.
Subscribe to:
Posts (Atom)